国内oh-my-zsh安装配置
封面
1 环境
1.1 安装基本工具
安装基本工具
# 更新软件源
sudo apt update && sudo apt upgrade -y
# 安装 zsh git curl
sudo apt install zsh git curl -y
设置默认终端为 zsh(注意:不要使用 sudo)。
chsh -s /bin/zsh
1.2 安装 oh-my-zsh
官网:http://ohmyz.sh/。 安装方式任选一个即可。
| Method | Command |
|---|---|
| curl | sh -c "$(curl -fsSL https://install.ohmyz.sh/)" |
| wget | sh -c "$(wget -O- https://install.ohmyz.sh/)" |
| fetch | sh -c "$(fetch -o - https://install.ohmyz.sh/)" |
| 国内curl镜像 | sh -c "$(curl -fsSL https://gitee.com/pocmon/ohmyzsh/raw/master/tools/install.sh)" |
| 国内wget镜像 | sh -c "$(wget -O- https://gitee.com/pocmon/ohmyzsh/raw/master/tools/install.sh)" |
注意:同意使用 Oh-my-zsh 的配置模板覆盖已有的 .zshrc。
2 主题
2.1 自定义主题
sudo wget -O $ZSH_CUSTOM/themes/haoomz.zsh-theme https://cdn.haoyep.com/gh/leegical/Blog_img/zsh/haoomz.zsh-theme
编辑 ~/.zshrc 文件,将 ZSH_THEME 设为 haoomz。当然你也可以设置为其他主题,例如lukerandall、robbyrussell。
vim ~/.zshrc

ZSH_THEME="agnoster"

source ~/.zshrc

image.png
效果如下(robbyrussell → agnoster):

image.png
2.2 推荐主题
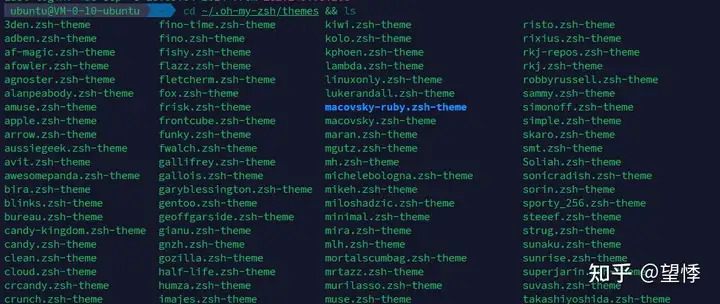
你可以在内置主题样式截图中查看所有 zsh 内置的主题样式和对应的主题名。这些内置主题已经放在 ~/.oh-my-zsh/themes 目录下,不需要再下载。
cd ~/.oh-my-zsh/themes && ls
2.2.1 powerlevel10k
根据 What’s the best theme for Oh My Zsh? 中的排名,以及自定义化、美观程度,强烈建议使用 powerlevel10k 主题。
# 国内用户可以使用 gitee.com 上的官方镜像加速下载
git clone --depth=1 https://gitee.com/romkatv/powerlevel10k.git ${ZSH_CUSTOM:-$HOME/.oh-my-zsh/custom}/themes/powerlevel10k
在 ~/.zshrc 设置 ZSH_THEME="powerlevel10k/powerlevel10k"。接下来,终端会自动引导你配置 powerlevel10k,具体配置可以自行翻译。
3 安装插件
oh-my-zsh 已经内置了 git 插件,内置插件可以在 ~/.oh-my-zsh/plugins 中查看,下面是两个我常用的插件,更多插件可以在 awesome-zsh-plugins 里查看。
3.1 插件推荐
3.1.1 zsh -autosuggestions
zsh-autosuggestions 是一个命令提示插件,当你输入命令时,会自动推测你可能需要输入的命令,按下右键可以快速采用建议。效果如下:
提示
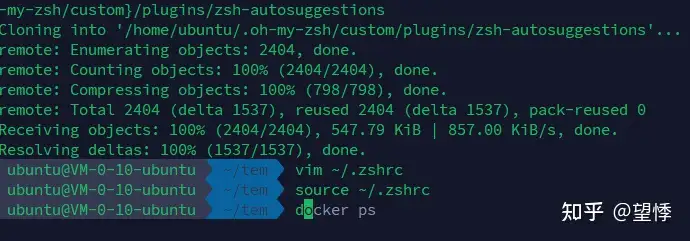
安装方式:把插件下载到本地的 ~/.oh-my-zsh/custom/plugins 目录。
# 国内用户使用gitee
git clone https://gitee.com/hailin_cool/zsh-autosuggestions.git ${ZSH_CUSTOM:-~/.oh-my-zsh/custom}/plugins/zsh-autosuggestions
3.1.2 zsh-syntax-highlighting
zsh-syntax-highlighting 是一个命令语法校验插件,在输入命令的过程中,若指令不合法,则指令显示为红色,若指令合法就会显示为绿色。效果如下:

安装方式:把插件下载到本地的 ~/.oh-my-zsh/custom/plugins 目录。
# 国内用户可用
git clone https://gitee.com/Annihilater/zsh-syntax-highlighting.git ${ZSH_CUSTOM:-~/.oh-my-zsh/custom}/plugins/zsh-syntax-highlighting

# github
git clone https://github.com/zsh-users/zsh-syntax-highlighting.git ${ZSH_CUSTOM:-~/.oh-my-zsh/custom}/plugins/zsh-syntax-highlighting
3.2 启用插件
修改~/.zshrc中插件列表为:
vim ~/.zshrc
# 修改plugins并保存
# plugins=(git zsh-autosuggestions zsh-syntax-highlighting z extract web-search)
source ~/.zshrc
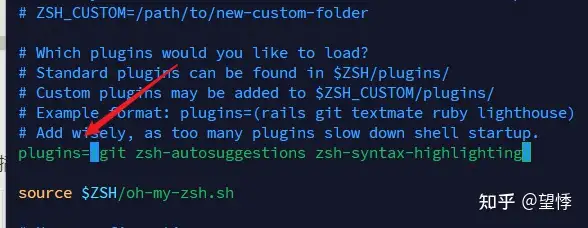
部分插件需要参考插件介绍进行安装。
配置完成后重新启动 Shell 或执行 source ~/.zshrc,就可以开始体验插件。
4 其它
4.1 root 用户
当你配置好登陆用户的 zsh 后,如果使用sudo su命令进入root用户的终端,发现还是默认的bash。建议在root用户的终端下,也安装on my zsh,设置与普通用户不同的主题以便区分,插件可以使用一样的。 root用户的~/.zshrc配置,仅供参考:
ZSH_THEME="ys"
plugins=(git zsh-autosuggestions zsh-syntax-highlighting)
# 或
plugins=(git colored-man-pages colorize cp man command-not-found sudo suse ubuntu archlinux zsh-navigation-tools z extract history-substring-search python zsh-autosuggestions zsh-syntax-highlighting)
4.2 docker访问出现问题
在安装oh-my-zsh后遇到permission denied while trying to connect to the Docker daemon socket错误,这个通常是因为当前用户没有正确地加入docker组,或者组成员身份没有在新的zsh会话中生效。
# 添加用户到 docker 组
sudo usermod -aG docker $USER
# 重新加载组成员
newgrp docker
# 使用docker命令验证
docker ps
其它相关错误也类似解决办法。
4.3 配置本地代理
如果你配置了本地代理,并希望终端的 git 等命令使用代理,那么可以在~/.zshrc中添加:
# 为 curl wget git 等设置代理
proxy () {
  export ALL_PROXY="socks5://127.0.0.1:1089"
  export all_proxy="socks5://127.0.0.1:1089"
}

# 取消代理
unproxy () {
  unset ALL_PROXY
  unset all_proxy
}
其实推荐